
Adding images and files to pages
This page gives instructions on uploading or adding images or files to pages that you are editing. For more general information on editing pages, see editing pages.
Introduction
Our website system allows you to upload pictures to pages whilst you edit them, as well as insert link to files you upload. You can also use pictures/files that you uploaded to the site on a previous occasion.
Before you can perform any of the actions documented below, you must open the "Add images and files to page" section:
- First make sure you are editing the page to which you want to add the image/file, and that you are looking at the "Content" tab (where you can type in the page text).
-
Just below the content editor you should see the following link:
Click on this link and a section will expand below the content editor, titled "Add images and files to page". Upload or choose an image to add to the page...
The page below is divided into 4 sections describing: (click on a section in this list to scroll down to it)
- How to upload images/files
- How to use previously uploaded images/files
- How to add an image to the page
- How to add a file link to the page
1 - Uploading whilst editing
To upload images or documents, the steps are the same.
If you have already uploaded the file on a previous occasion, for example on a different page, see the "Using a previously uploaded file" section below.
- Below the "Add images and files to page" heading you should see a button labelled "Select files" or "Choose file".
- Click this button to bring up a window where you can browse files on your computer.
- Navigate to the file you want to upload in your computer's folder system, and open it.
- Click "Upload" to finish.
- A message will tell you the upload has been a success.
When the file(s) you need are uploaded, you should see they have been added to a gallery below the "Select files" button, where they will show either the image thumbnail or file name (for non-images):
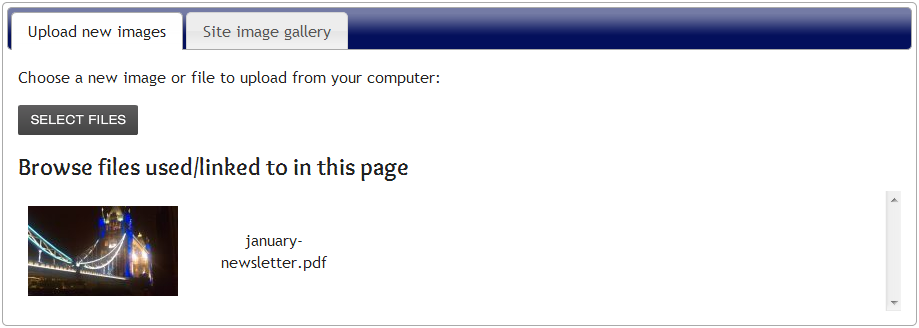
Note: This gallery will also show images already used in the page you're editing, and files already linked to.
You are now ready to add the image or file to the page, see the relevant sections of this page:
2 - Using a previously uploaded file
To use an image or file that you previously uploaded to another page, or using the upload page, click the second tab under the "Add images and files to page" heading:
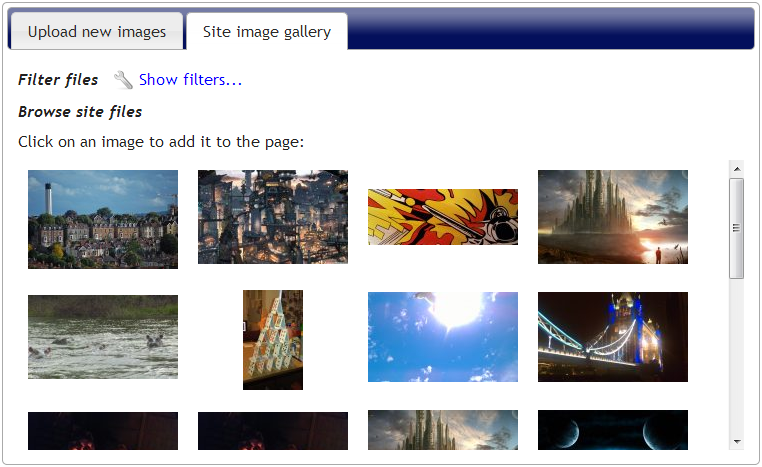
This will display a gallery of all images uploaded to the site as thumbnails. If you a looking for a file that isn't an image (like a document/PDF), click the ![]() Show filters... link. You can also use filters to narrow the selection of images shown. The following buttons will be displayed to allow you to filter the files/images shown in the gallery:
Show filters... link. You can also use filters to narrow the selection of images shown. The following buttons will be displayed to allow you to filter the files/images shown in the gallery:
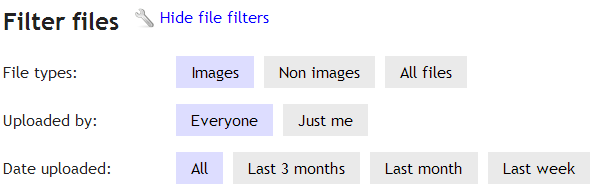
- File types: The default filter is set to show only images. You can change this show only non images (documents/PDFs etc), or all files.
- Uploaded by: If you know that the file you are looking for was uploaded by you, you can choose "Just me" to hide from the gallery files uploaded by other user accounts.
- Date uploaded: If you know roughly when the file was uploaded, you can choose to show only files from the last week, month, or 3 months.
If no files match the selection of filters you have chosen, you will see the following message:
No files were found matching the filters given.
Try adjusting the filters above to include more files.
Note: If your site has no files uploaded, you will always see this message!
When you find the image you are looking for to add, or find the name of the file you want to link to on the page, you are ready to add the image/file to the page. See the relevant sections of this page:
3 - Adding an image to the page
These steps explain how to add an image to the page:
- First you need to place the cursor where you want to image to appear in the page content editor - just like if you were about to start typing there.
- When the cursor is in the right place, simply click on the image thumbnail from the "Add images and files to page" gallery.
- The image will appear in the page.
Customising image appearance
By default the image will be left aligned (text flows to the right of it), and scaled down so it's not too large. You can change these properties though by right-clicking on the image and selecting "Image Properties". A small window appears with several useful setting in:
-
Width/Height: These adjust the size of the image, and are measured in pixels. As a rough guide to sizes, the paragraphs on this page are about 950 pixels wide.
To ensure that the image does not get 'squashed' or 'stretched', make sure that there is a locked padlock symbol to the right of the width/height boxes: , this means that the image aspect ratio is locked, i.e. if you change one of the dimensions, the other dimension will scale accordingly. If an unlocked padlock is shown: , you can click on it to change it to locked. - Border: The image is inserted into the page with a border width of 1 pixel, so this box will have a 1 in. to remove the border change it to 0, or to make it thicker choose a higher whole number.
- Alignment: The alignment defaults to left, this means that text is wrapped round the right of the image. The opposite of this is to align right, where the text will continue down the left hand-side of the page and the image site on the right side. Selecting an alignment of "<none>" means that the image behaves like it's text, so you can type before and after it, or leave it in its own paragraph.
As you make changes in this window, the preview image shown will reflect your live changes so you can get an idea of what the effect of clicking "OK" will be.
Moving images
To move an image, left-click on the image and hold down to drag it around the page. As you drag, the cursor will move to show where the image will 'land' when you release the click.
Deleting images
To delete an image, left-click on it so that it's highlighted in blue, and then press the delete or backspace key on your computer's keyboard.
4 - Adding a file link to the page
These steps explain how to add a link to a file in the page, using the "Add images and files to page" area:
- Place the cursor in the editor where the link to the uploaded file should appear (like you were about to type there).
- When the cursor is in the right place, click on the file name in the upload list (the area below the editor).
- A small window will appear asking you to 'enter the text to display for this file link'. This is the hyperlink text that the user will click on in the page to access the file. When you have typed the text you want to display, click "OK".
- The hyperlink to the file will appear in the page with the text you have provided.
Alternatively, you can add links to previously uploaded files in the same way as you would add an ordinary page hyperlink. See section 3 ("Linking to uploaded files") of this support page for instructions.

